Thursday, December 23, 2010

Christmas Anticipation

The anticipation of Christmas can almost be too much for children. I captured this brief moment of my nephew lying on the floor looking at the presents. I lay down on the floor to get his view point. I made this page using the current Bo Bunny Christmas range to create two shaped photo frames.

For this page you will need two sheets of the quadrant paper to create the shaped frames. Cut out around the outer edge of the red shape in the bottom left hand corner of the page.


Now using a craft knife, slit inside the red edge of the frame at the top and the bottom for a vertical photo (or left and right sides if you want to use a horizontal photo.)

Slip the photo into the slits.


Using a liquid glue, glue the red frame onto the photo.

Cut the photo off in line with the red frame.


This is what it should look like once completed.

Now overlap these two photo frames on the co-ordinating background paper, add striped paper at the base, add Christmas embellishments and images cut out from the top right quadrant, add title and journaling.
Happy holidays!


Sunday, December 19, 2010

Homemade Christmas Presents

Why don't you put your cooking skills to good use this Christmas and make homemade Christmas gifts. They are so much more appreciated. Here are some ideas:


Pesto is quick and easy - just blend all the ingredients together and bottle it. Make a tag listing all the ingredients.


Apricot jam is just as easy to make. Remove the pips and weigh the fruit. Use equal quantities of sugar to fruit and add a dash of water to help the sugar dissolve. Boil the jam until it reaches setting point ie 105°C on a sugar thermometre or put a little jam on a plate and pop it into the freezer until cold. Then push the cold jam with your finger to see if it wrinkles. Once setting point has been reached, bottle the jam in sterilised bottles ( heated in the oven at 100°C for 10 minutes) and seal while hot. Decorate the jam with fabric and a tag.

Or you could use your favourite cake or biscuit recipe and bake a lovely delicious cake. That will always go down well.
Happy cooking and baking.
Adrienne


Sunday, December 12, 2010

Behind the scenes


December and time to prepare for Christmas. Why not take a photos of all your Christmas shopping, baking, wrapping of presents, decorating trees etc. Then make a page to show what happens "behind the scenes".


This single page of retail therapy I made some time ago as the back page for an album, and could easily be adapted for a Christmas shopping page.


The close up shows the detail of the tag which was made with metal mesh which was painted with paint on the edges. The metal tags were tied on with wire and the tag was then lined with a matching colour. The wire then had a bit of ribbon tied to it to embellish it. Each tag was then decorated with a little shopping bag. How cute are they?

Happy shopping

Adrienne

Monday, November 15, 2010

YOU BEAUTY

These are some of our sightings for one day in the Kruger National Park ...


From the Big 5 list ... this magnificent leopard;


a pleasing encounter with an elephant;


and an old, laid back Buffalo.


From my 'Little five' list ... a beautiful kudu browsing;


a weawer working very hard at building a nest;


two Grey Herons having a difference of opinion;

a little tortoise crossing the road;


and the bush ablaze with colour.

Not bad for 8 hours in the bush and enough to give our foreign visitors a taste of Kruger.

Thursday, October 28, 2010

Make some quick greeting cards


I don't believe in spending a lot of time making greeting cards. The ideal opportunity presents itself once you have finished making your page. Use the left over scraps of paper to quickly put together a few cards. It doesn't cost you a lot in both time and supplies. Also all the papers are already co-ordinated from the page you just made.
Pen stitching is a great way to add a quick bit of detail to the card.
Enjoy your weekend.

Monday, October 25, 2010

Glitter up your heritage photos

Don't be afraid to use glitter with your heritage photos.

My Mind's Eye has the most beautiful, subtle range of glitter paper and embellishments available at the moment. The paper I used below had the banners and "celebrate" already printed on the paper.


I used the matching printed lettering to spell out "A handful of love". What I did was raised each little banner on some foam adhesive to create a bit of dimension.

Another tip you can implement is when you want to end off a ribbon in the middle of the page without an embellishment to finish off the raw edge - just make a slit in the page with your craft knife and thread the ribbon through to the back and stick it down with tape. That way it is neat and won't fray on the front of the page.
Here you can see some of the glitter detail. By using foam adhesive you create shadows on the page which adds another dimension of interest to the page.
Heritage photos can sometimes curl, so another tip to remember is use a stronger adhesive such as a double sided tape to adhere the photos to the page.

Happy scrapping.


Monday, October 18, 2010

For many years now I have been making Christmas gifts for indigent old aged pensioners. The party is hosted by a school and the old people are given a lunch and are entertained. The 250 old folk also each receive a gift. I have made beaded sugar spoons, key rings, magnetic picture frames, notelets in envelopes, bookmarks, soaps rolled in a facecloth - just to mention a few.

This year I made, together with the help of some scrappers, 250 wallets that could hold a nail file. They are ideal to keep in your purse. You might want to make some yourself so this is how you go about making them:
Using only scraps of card stock, cut one piece for the bottom layer 4cm x 13cm and a second piece for the top layer 4cm x 10cm.
Punch a semi-circle out of the top layer using a 1 and 1/2" round punch.

Ink the top layer of card stock all the way round and just the top edges of the bottom layer.
Repeat this process 250 times or however many times you like!
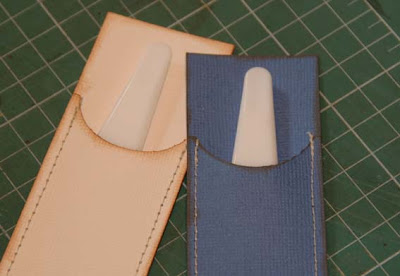
Place the curved layer on top of the longer bottom layer and stitch together by machine on three sides to create a pocket. Back stitch at the beginning and end of the machine stitching.
Trim the threads short - the stitching shouldn't unravel because of the back stitching.Take the nail files out of their packaging and insert a nail file into each little wallet.
The fun part is the decorating. Gather a supply of flowers, tiny buttons and ribbons.

You will need to colour co-ordinate each flower and button with the wallet colour.

For the lady's wallets they each got a flower with a button and for the men's wallet the got an off-cut of ribbon tied into a loose knot with two buttons to create a "bow tie and shirt"

These nail file wallets make great stocking fillers for Christmas. Why not give it a bash? It is also a great way to use up leftover card stock. If the nail file you buy is longer in size just make the wallet proportionately longer.

Happy stitching _ _ _ _ :)

Tuesday, September 28, 2010

We are back from Italy

What a wonderful trip we had.
These are just a few photos to show you where we went and what we did.


In Rome we toured the Colosseum

and the Vatican with all the famous works of art,


we tossed a coin into Trevi Fountain,

and sat on The Spanish Steps.

In Florence we saw the great Duomo but didn't climb to the top,
walked over the Ponte Vecchio,
saw three versions of the statue of David,
and watched the sun set over Florence from the Michaelangelo Hill.We spent our time in Tuscany on a wine and olive farm
and negotiated our way through the narrow streets.
We visited the medieval towns of San Gimignano and Siena,
and rode a Segway in Pisa.
We wound our way about the canals of Venice,

had waterside seats for the Regata Storica,

toured the beautiful Palazzo Ducale,
visited the colourful island of Burano,
drank and ate all the delicious Italian fare on offer


and generally had a great time!
Now it is back to work.