Thursday, October 28, 2010

Make some quick greeting cards


I don't believe in spending a lot of time making greeting cards. The ideal opportunity presents itself once you have finished making your page. Use the left over scraps of paper to quickly put together a few cards. It doesn't cost you a lot in both time and supplies. Also all the papers are already co-ordinated from the page you just made.
Pen stitching is a great way to add a quick bit of detail to the card.
Enjoy your weekend.

Monday, October 25, 2010

Glitter up your heritage photos

Don't be afraid to use glitter with your heritage photos.

My Mind's Eye has the most beautiful, subtle range of glitter paper and embellishments available at the moment. The paper I used below had the banners and "celebrate" already printed on the paper.


I used the matching printed lettering to spell out "A handful of love". What I did was raised each little banner on some foam adhesive to create a bit of dimension.

Another tip you can implement is when you want to end off a ribbon in the middle of the page without an embellishment to finish off the raw edge - just make a slit in the page with your craft knife and thread the ribbon through to the back and stick it down with tape. That way it is neat and won't fray on the front of the page.
Here you can see some of the glitter detail. By using foam adhesive you create shadows on the page which adds another dimension of interest to the page.
Heritage photos can sometimes curl, so another tip to remember is use a stronger adhesive such as a double sided tape to adhere the photos to the page.

Happy scrapping.


Monday, October 18, 2010

For many years now I have been making Christmas gifts for indigent old aged pensioners. The party is hosted by a school and the old people are given a lunch and are entertained. The 250 old folk also each receive a gift. I have made beaded sugar spoons, key rings, magnetic picture frames, notelets in envelopes, bookmarks, soaps rolled in a facecloth - just to mention a few.

This year I made, together with the help of some scrappers, 250 wallets that could hold a nail file. They are ideal to keep in your purse. You might want to make some yourself so this is how you go about making them:
Using only scraps of card stock, cut one piece for the bottom layer 4cm x 13cm and a second piece for the top layer 4cm x 10cm.
Punch a semi-circle out of the top layer using a 1 and 1/2" round punch.

Ink the top layer of card stock all the way round and just the top edges of the bottom layer.
Repeat this process 250 times or however many times you like!
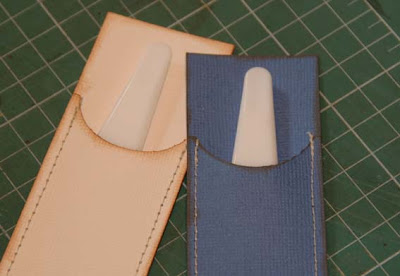
Place the curved layer on top of the longer bottom layer and stitch together by machine on three sides to create a pocket. Back stitch at the beginning and end of the machine stitching.
Trim the threads short - the stitching shouldn't unravel because of the back stitching.Take the nail files out of their packaging and insert a nail file into each little wallet.
The fun part is the decorating. Gather a supply of flowers, tiny buttons and ribbons.

You will need to colour co-ordinate each flower and button with the wallet colour.

For the lady's wallets they each got a flower with a button and for the men's wallet the got an off-cut of ribbon tied into a loose knot with two buttons to create a "bow tie and shirt"

These nail file wallets make great stocking fillers for Christmas. Why not give it a bash? It is also a great way to use up leftover card stock. If the nail file you buy is longer in size just make the wallet proportionately longer.

Happy stitching _ _ _ _ :)